Turn the WiFi dead zones into fun zones with Wavlink WiFi setup. Wavlink extender can help you get high-speed, stable internet all across your home. You need to perform the Wavlink extender setup with the router to get it connected to the WiFi.
Ap.setup is the default web address that helps you connect your Wavlink extender to WiFi. When you’re on the ap.setup page, you need to click on the ‘WAvlink extender setup’ option to get it connected to the WiFi.
However, at times, when a user enters ap.setup into the browser, he/she fails to get redirected to the wavlink setup screen. This happens due to a number of reasons such as-
- Device not connected to the Wavlink network
- Slow or unstable internet connection
- The browser isn’t compatible
- Outdated firmware
- Physical incompatibility
- Technical glitch
Once you fix all these issues, you’ll be able to connect Wavlink extender to Wi-Fi.
There are two methods to perform the Wavlink extender setup which are-
- Web Browser Method
- WPS Method
WavLink Extender Setup Using Web Browser Method
Use the web address ap.setup to perform the wavlink extender setup and connect it to the Wi-Fi. Follow the below-given instructions carefully to avoid any errors-
- Plug your Wavlink extender into the electrical outlet.
- Connect your computer to the wavlink default network.
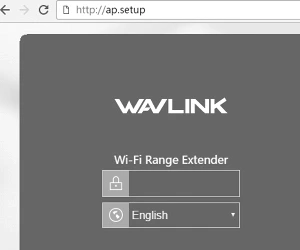
- Open the web browser and type ap.setup in the address bar.
- Fill in the login details on the wavlink login page.
- Click ‘Enter’ to get into Wavlink setup page.
- On the wavlink setup page, you will see the list of available wireless networks
- Select your home network from the list and click on its SSID.
- Enter the wireless password of your home network.
- Click ‘Connect’
- Your wavlink extender is now connected to the WiFi of your home network.
The Wavlink extender by default will copy the wireless settings of your home network. You can customize the wireless settings by going to the ‘Wireless’ tab.
Wavlink Extender Setup Using WPS Method
Wi-Fi Protected Setup is another method for Wavlink extender setup. This method will only work if your wireless router also supports the WPS button. Here are the steps to perform the Wavlink extender setup-
- Power On the Wavlink extender by plugging it into a power outlet.
- Locate the WPS button on the Wavlink extender and router.
- First, press the WPS button on the Wavlink extender followed by on the wireless router.
- The WPS LED on the Wavlink extender will first blink and then get stable.
- Your Wavlink device is now connected to the internet.
Final Words: Connecting Wavlink Extender to Wi-Fi
Use any of these two methods to connect the Wavlink extender to Wi-Fi. If you encounter any issue while connecting wavlink extender to the internet, you can contact our in-house experts for help. Our team is available 24/7 for support. Call us on our toll-free number. Or, simply chat live with our experts.