Wavlink docking station is a popular choice for tech enthusiasts looking to obtain ultra-fast data transfer speeds and enjoy connectivity without lags. Though there’s a whole range of options available for docking stations available on the market, ones offering connectivity through USB3.0 and USB2.0 channels are rare. This is where Wavlink comes in- helping users enjoy lightning fast connectivity at all times.
However, to ensure you can make the most out of this device, learning how to use the Wavlink docking station is essential. This blog will walk you through the steps for Wavlink docking station setup and also address general issues that users face when using the same. The steps to be discussed in this blog can be used for setting up Wavlink Thunderbolt 4 triple display docking station, Wavlink USB C dual 4k docking station, Wavlink 5K Docking Station, and Wavlink USB C triple display docking station as well.
Wavlink Docking Station Manual You Need
Before we get into the details of Wavlink docking station setup, let’s dive into the specifications that help with seamless connectivity.
- The docking station supports Windows 10/8.1/8/7 and Legacy XP systems, macOS X based on Intel processors. While one may easily assume, but Linux/Unix aren’t supported yet.
- Accessing up to two full-HD displays (HDMI and DVI-I) is easy and you can extend your desktop to external monitors.
- The device supports VGA Output through DVI to VGA converter which delivers a 15-pin support resolution up to 1280*1024px.
- Compatible with USB-C and USB-A computers, so you can select various combinations of displays viz. 4 displays, 3 displays, 2 displays and power.
Steps for Wavlink Docking Station Setup
Hardware Installation Process
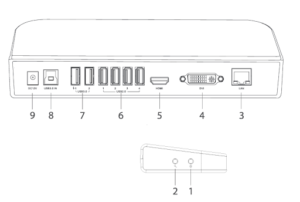
As visible in the image, the port labeled 1 is the headphone output, and 2 is the microphone input.
- Number 3 is the gigabit LAN port and allows users to connect an ethernet cable. This port is usually provided for the high-speed interface.
- The DVI port (labeled 4) allows you to connect the DVI monitor with maximum resolution i.e. 2048*1152.
- The HDMI port (labeled 5), allows you to connect the HDMI monitor with maximum resolution 208*1152 to the dock.
- You can use the USB 2.0 ports(labeled 6) to connect devices like scanner, digital camera, keyboard, mouse and printer.
- The type A(labeled 7) ports allow for connections to USB 3.0 compatible devices.
- The USB 3.0 interface(labeled 8) can help connect the universal docking station to an available USB3.0 port on a laptop, PC or other similar devices.
- The DC power jack (labeled 9) allows for the the DC power adaptor to be connected to the docking station.
System Requirements for Wavlink Docking Station Setup
In order for the Wavlink docking station to work as per requirements, here are the basic system requirements which must be ensured:
- A dual-core 2GHz+ CPU and 2GB RAM for best performance.
- A computer screen for use with the device.
- A supported Intel/AMD or Nvidia main GPU and a WDDM compatible driver.
- You’ll also need an updated 3.0 host controller drivers and graphics drivers which are usually recommended for the best performance. This also helps avoid compatibility issues greatly.
- You’ll also need to download the Windows 10, 8.1, 7, and XP drivers from the www.wavlink.com website.
Software Installation Process for Wavlink USB 3.0 Universal Docking Station
For Windows
- Select Driver for Windows and then double click on the Setup.exe to launch the installation wizard.
- Follow the on-screen instructions until the installation is complete. Once done, the system will ask your permission to reboot itself. Do it once you receive the prompt.
Wavlink USB 3.0 Docking Station Installation for MacOS
- Download the latest driver for your version of the macOS system from the Wavlink official website(www.wavlink.com).
- Open the Downloads folder on your system and open the driver file that was downloaded.
- Double click on the “DisplayLink Software Installer.pkg” file you see. Once you do that, a new menu will show up depending upon your security settings.
- Once you see the same, click on the Ok button to proceed.
- On your macOS system, navigate to the Applications menu and then open the DisplayLink Manager.
- Click on the “DisplayLink Manager” application icon in the notification area to open the application window. This will ensure that software gets installed and starts running properly.
- From the final dashboard window, select the “Launch Automatically after logging-in” option. This will ensure that the software starts automatically every time you log in.
You can now connect the peripherals using the DisplayLink technology and navigate to your System Preferences to turn on the Security & Privacy feature. You can also enable the “Screen Recording” feature to allow for the DisplayLink Manager application to capture Pixels and send them over to your USB peripherals.
If you have enabled notifications from the DisplayLink Manager, the app will remind you to allow the screen recording whenever it detects that the permission is missing. You will also see this notification appear in the DisplayLink Manager window.
Finally, you will see the “Quit and Reopen” option on your macOS, since the new permissions will only be applied the next time you launch the app. If you are on Catalina 10.15.x version, you can select “Sign Out Now” option. The menu will now close and you can reopen the DisplayLink Manager from the application in the Finder. Your monitor will now start working normally.
FAQs
What should I do if my Wavlink Thunderbolt 4 docking station is not working on macOS?
Wavlink docking stations may malfunction if the DisplayLink Graphics Manager App isn’t downloaded and installed properly on macOS. General issues like wavlink docking station not working mac can be solved easily. You can use this website- https://www.synaptics.com/products/displaylink-graphics/downloads/macos to locate and install the correct app as per your macOS system specifications.
Also, if your product is using the DisplayLink Solution, the DisplayLink Manager App must be opened every time to be displayed.
If not, open the app manually and select “Launch automatically after logging-in” option for the software to auto-start every time you log in. Also ensure the app is allowed to Screen record.
What if I am facing issues with my WAVLINK DisplayLink-based USB docking station on Windows?
Here are some steps you can follow to fix issues with your docking station on Windows:
- Disconnect your Wavlink Docking station from the system and remove the power cable as well. This ensures that it turns off completely. Ensure that the device stays turned off till the very last step.
- Now, uninstall the DisplayLink software using the Control Panel window. If there’s no such app installed, move on to the next step.
- Download, extract and run the DisplayLink Cleaner tool using this link- https://synaptics.com/products/displaylink-graphics/downloads/windows-installation-cleaner.
- Once the cleaner has been run, reboot the system.
- Now, again download and install the latest DisplayLink software from this link: https://www.synaptics.com/products/displaylink-graphics/downloads/windows.
- Connect back the power cable to the dock. Once it is powered on, reconnect it to your system. This will trigger the final portion of the installation. If the device is not detected, you can click on the “Skip” button to allow for the process to complete and then reboot the system.
If following these steps doesn’t help restore the device, you can reset the docking station.
Key Takeaways
If you are looking to setup Wavlink USB 3.0 docking station, connect the power adapter and link the dock to your computer using a USB-C or USB-A cable. You can now download and install the necessary DisplayLink drivers from the Wavlink website. On mac, you might also need to allow screen recording permissions in the system settings.